I. Why Do Your Injection Molded Parts Keep Failing? Understand the Root Causes First!
Injection molding might seem simple (melted plastic injected into a mold to cool into shape), but in reality, minor deviations in material properties, mold design, process parameters, or machine conditions can lead to defects. Statistics show over 60% of injection molding defects stem from “treating symptoms, not causes”—for example, blaming sink marks on the material when it’s actually due to insufficient cooling.This article summarizes the 10 most common injection molded part defects, from symptoms to root causes and solutions. Follow this guide to quickly diagnose issues and cut your scrap rate dramatically!
II. 10 Common Defects & How to Fix Them (With Practical Steps)
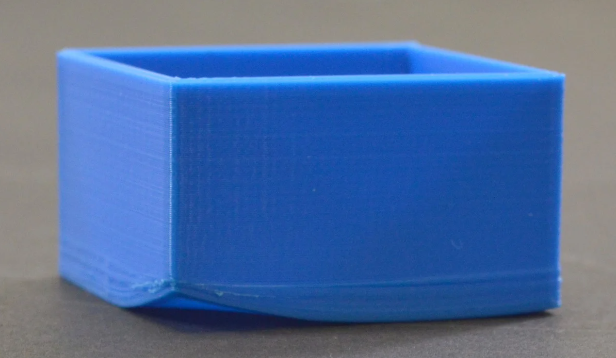
Defect 1: Flash (Excess Material) – “Extra Plastic” on Edges
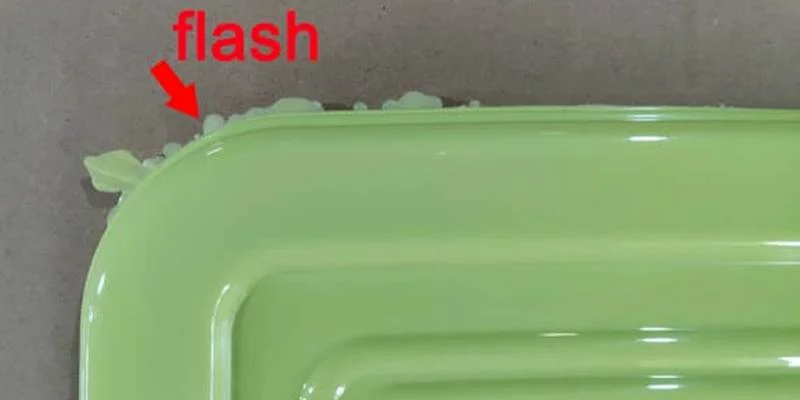
What it looks like: Thin, unwanted plastic overflow on parting lines, slider edges, or ejector pin areas (like “plastic burrs”).Root causes:
- Insufficient clamping force: Injection pressure exceeds the mold’s clamping capacity.
- Mold wear/gaps: Worn parting surfaces, loose sliders, or damaged ejector pins.
- Overly aggressive process: Too high injection pressure/speed or excessive holding time.
- Material issues: High-flow plastics (e.g., LDPE) or overly high melt temperatures (reduced viscosity).
Solutions:
✅ Check the mold first: Clean parting surfaces (use a brass scraper to remove flash), inspect sliders/ejectors for wear (gaps >0.02mm need repair).
✅ Adjust process parameters: Lower injection pressure (80–120MPa) and speed (use medium speed), shorten holding time (observe if the part is over-packed).
✅ Boost clamping force: For older molds, verify the injection machine’s clamping force matches the part’s projected area (formula: Clamping force > Projected area × Injection pressure × 1.2 safety factor).
✅ Switch materials: Replace high-flow plastics (e.g., LDPE) with lower-flow alternatives (e.g., HDPE), or reduce barrel temperature (every 10°C drop cuts flowability by ~15%).
Case study: A client’s ABS phone case had constant flash. We found worn sliders (0.05mm gap), repaired them, and reduced injection pressure to 100MPa—flash disappeared.
Defect 2: Sink Marks (Depressions) – “Dents” on Thick Sections
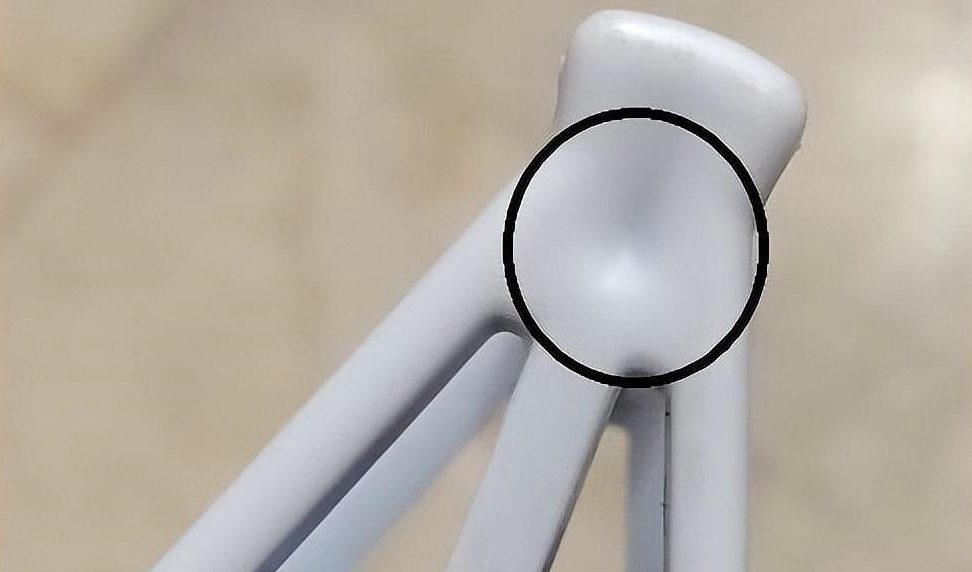
What it looks like: Indentations on thick walls (e.g., ribs, posts) or overall undersized parts (like “not fully filled”).Root causes:
- Insufficient cooling/holding: Not enough holding time to compensate for shrinkage.
- Poor gate design: Small/limited gates causing uneven filling.
- High mold temperature: Slower cooling = more shrinkage.
- Material shrinkage: High-shrinkage plastics (e.g., PP: 1.5–2%; PA66: 0.8–1.5%).
Solutions:
✅ Extend holding time: Observe until the part stops shrinking (typically add 10–30 seconds).
✅ Optimize gates: Enlarge runners/gates (suggest 5–8mm diameter) or add more gates (multi-point gating for thin parts).
✅ Lower mold temperature: Keep mold water at 40–60°C (high temps prolong cooling).
✅ Switch materials: Use lower-shrinkage plastics (e.g., PC: 0.5–0.7%) or add fillers (e.g., glass fibers reduce shrinkage by 30%).
Case study: A car bracket’s thick ribs had deep sink marks. Extending holding to 45 seconds + enlarging gates (3mm → 6mm) reduced sink depth from 0.3mm to 0.05mm.
Defect 3: Bubbles (Air Pockets) – “Silver Streaks” or “Tiny Bubbles” Inside
What it looks like: Circular/silver streaks on surfaces (silver streaks) or tiny bubbles in transparent parts (like “air pockets”).Root causes:
- Moisture in material: Un-dried plastics (e.g., PA66 with >0.2% moisture).
- Poor venting: Blocked or insufficient venting slots (ideal depth: 0.02–0.05mm).
- Too-fast injection: Air trapped in the melt can’t escape.
- High melt temperature: Material decomposition (e.g., PVC releasing HCl).
Solutions:
✅ Dry materials properly: Dry hygroscopic plastics (e.g., PA66) at 80–100°C for 4–8 hours (moisture <0.1%).
✅ Improve venting: Add vent slots on parting lines/slide edges (depth 0.03mm optimal) or use vent inserts.
✅ Reduce injection speed: Medium speed (avoid “trapping air” at high speed), especially for thin parts.
✅ Control melt temperature: Avoid excessive heat (e.g., PVC <200°C), try lowering barrel temp by 10–20°C.
Case study: A transparent PC lamp cover had bubbles. Cleaning blocked vents + lowering injection speed to medium resolved the issue.
Defect 4: Warpage (Twisting) – “Crooked” Parts That Don’t Fit
What it looks like: Flat parts bowed, or complex shapes (e.g., boxes) with lifted edges (like “warped wood”).Root causes:
- Uneven cooling: Hot spots (e.g., thick sections with distant water lines) cause differential shrinkage.
- Ejecting too early: Parts not fully cooled when ejected, deformed by external force.
- Material orientation: Fiber-filled plastics (e.g., GF-PA66) shrink differently along flow vs. cross-flow directions.
- Poor draft angles: <0.5° draft makes ejection friction high.
Solutions:
✅ Optimize water lines: Place water lines near thick sections (spacing 10–15mm), keep mold temp uniform (<10°C difference).
✅ Extend cooling time: Wait until core temperature drops below 80°C before ejection.
✅ Increase draft angles: Standard plastics ≥1°, high-gloss/thin parts ≥2°.
✅ Adjust materials: Use isotropic materials (e.g., ABS warps less than GF-PA66) or add lubricants to reduce friction.
Case study: A plastic tray warped 2mm. Adding 2 extra water lines near thick areas + extending cooling to 60 seconds reduced warp to 0.3mm.
Defect 5: Weld Lines (Knit Lines) – Visible “Seam Lines”
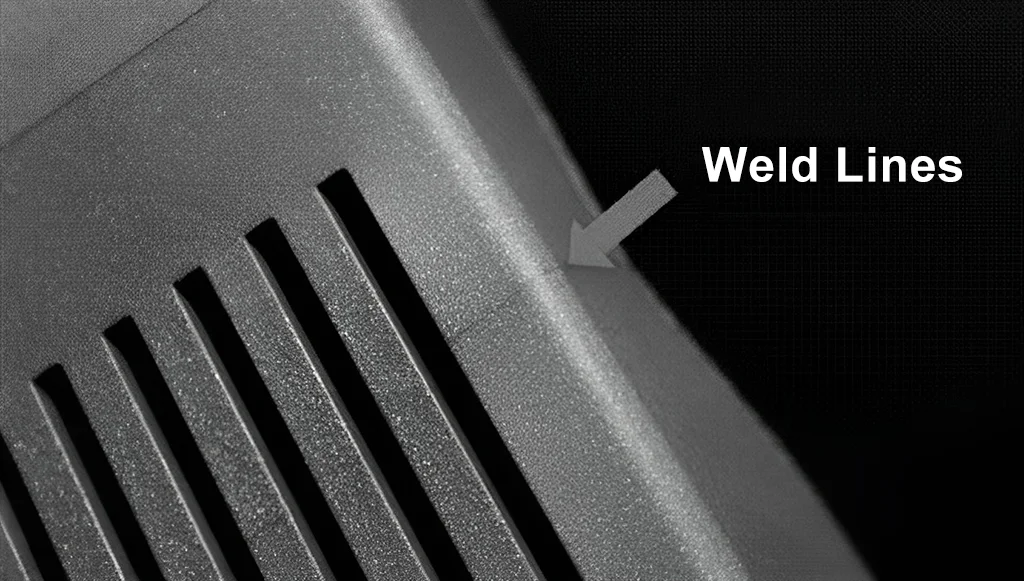
What it looks like: A visible line where multiple melt fronts meet (common in multi-gate molds).Root causes:
- Too few gates: Melt flows from one direction, causing temperature differences at merge points.
- Low injection speed: Melt fronts cool before merging, preventing proper fusion.
- Low mold temperature: Reduced melt flowability = weak weld.
- High-viscosity materials: Untreated plastics (e.g., non-dried PET).
Solutions:
✅ Add more gates: Use multi-point gating (e.g., circular gates) to let melt flow from different directions.
✅ Increase injection speed: Medium-to-high speed (ensure melt front temp > material melt point +20–30°C).
✅ Raise mold temperature: Set to the upper limit of the material’s recommendation (e.g., ABS: 60–80°C).
✅ Dry materials: High-viscosity plastics (e.g., PET) need 120–140°C drying for 4 hours (reduce viscosity).
Case study: A car interior panel’s weld lines were visible. Adding 2 auxiliary gates + raising mold temp to 70°C made them nearly invisible.
Defect 6: Burns (Black Spots) – “Charred” Areas
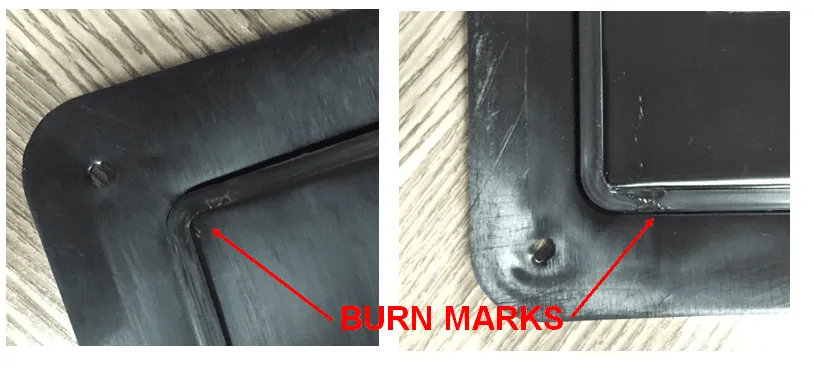
What it looks like: Black/brown scorch marks (often with a burnt smell) on edges/corners.Root causes:
- Too-fast injection: Air compression in the cavity generates heat (> material degradation temp).
- Poor venting: Trapped air can’t escape, leading to localized overheating.
- Excessive melt temperature: Material decomposes (e.g., PVC at >200°C).
- High screw speed: Excessive shear heat in the barrel.
Solutions:
✅ Reduce injection speed: Especially for thin/deep parts, use medium-to-low speed.
✅ Improve venting: Add deep vent slots (0.04–0.06mm) in trapped air zones (e.g., deep rib bases).
✅ Control melt temperature: Avoid exceeding material limits (e.g., PC <300°C, PVC <200°C).
✅ Check screw speed: Lower RPM to reduce shear heating.
Case study: A transparent PMMA lens had edge burns. Slowing injection speed + deepening vent slots (0.02mm → 0.05mm) eliminated the issue.
Defect 7: Dimensional Errors – “Wrong Size” Parts
What it looks like: Parts too big/small (e.g., holes too narrow, outer dimensions oversized), causing assembly failures.Root causes:
- Mold machining errors: Poor CNC precision (e.g., ±0.05mm tolerance > design requirement of ±0.02mm).
- Unstable processes: Inconsistent holding pressure/time causing shrinkage variations.
- Incorrect shrinkage rates: Using handbook values vs. actual material behavior (e.g., recycled plastics shrink more).
- Thermal expansion: High-temperature molds expand slightly (need compensation).
Solutions:
✅ Calibrate mold machining: Critical dimensions (e.g., mating holes) should be ±0.01–0.03mm.
✅ Stabilize processes: Record optimal injection pressure/holding time (avoid random adjustments).
✅ Test actual shrinkage: Measure parts post-mold and adjust mold dimensions (e.g., PA66 may shrink 0.1% more than listed).
✅ Compensate for thermal expansion: For high-temp molds (e.g., 150°C), design dimensions 0.01–0.03mm smaller per mm.
Case study: A plastic gear’s hole was 0.1mm too small. Adjusting holding pressure (+5MPa) + enlarging the mold hole (+0.02mm) fixed the fit.
Defect 8: Dull Surface – “Matt” or “Rough” Finish
What it looks like: Parts lack gloss (like “frosted”) or have localized hazy patches.Root causes:
- Poor mold polish: Rough cavity surfaces (Ra >0.2μm).
- Excess mold release: Residue from too much spray.
- Material degradation: High heat/long residence time breaks polymer chains (surface becomes brittle).
- Uneven cooling: Localized rapid cooling causes haze.
Solutions:
✅ Improve mold polish: Critical surfaces should reach Ra ≤0.05μm (mirror finish).
✅ Minimize mold release: Use only when necessary (e.g., silicone-based) and apply sparingly.
✅ Control melt temperature/time: Avoid keeping plastic in the barrel >30 minutes (especially PA66/PET).
✅ Optimize cooling: Adjust water lines for uniform surface cooling (temp difference <5°C).
Case study: A clear ABS panel looked hazy. Repolishing the cavity (Ra from 0.3μm → 0.08μm) + reducing mold release restored 90%+ gloss.
Defect 9: Short Shots – “Incomplete Filling”
What it looks like: Parts missing sections (e.g., thin edges not filled, or thin ribs only half-formed).Root causes:
- Insufficient injection pressure: Melt can’t reach far sections.
- Small/limited gates: Restricted melt flow.
- Low mold temperature: Reduced melt flowability.
- Low-flow materials: Untreated or high-viscosity plastics.
Solutions:
✅ Increase injection pressure: Gradually raise to 120–150MPa (watch for over-packing).
✅ Enlarge gates: Main runners ≥5mm, branches ≥4mm.
✅ Raise mold temperature: Set to material recommendations (e.g., PBT: 80–100°C).
✅ Dry materials: Hygroscopic plastics (e.g., PBT) need 100–120°C drying for 3–5 hours.
Case study: A thin-walled lid had unfilled edges. Enlarging gates (2mm → 4mm) + raising pressure to 130MPa solved the issue.
Defect 10: Silver Streaks – “White Lines” on Surfaces

What it looks like: White/semi-transparent lines (like “water marks”) on transparent/light-colored parts.Root causes:
- Un-dried materials: Moisture vaporizes under heat (e.g., PA66 with >0.2% moisture).
- Too-fast injection: Air trapped in melt combines with moisture.
- Low mold temperature: Prevents moisture evaporation.
- Mold release reactions: Some sprays react with plastic.
Solutions:
✅ Dry materials thoroughly: PA66/PC need 80–120°C drying for 4–8 hours (moisture <0.1%).
✅ Reduce injection speed: Medium speed (avoid air entrapment).
✅ Raise mold temperature: Match material recommendations (e.g., clear PC: 80–100°C).
✅ Clean molds: Wipe off mold release residue with alcohol or switch to low-reactivity sprays.
Case study: A transparent PMMA cup had silver streaks. Drying to 0.05% moisture + lowering speed fixed them.
III. Quick Troubleshooting Checklist
1.Identify the defect (flash, sink, bubbles, etc.).
2.Check the root cause (material, mold, process).
3.Adjust one variable at a time (e.g., try raising mold temp before changing material).
4.Document changes (track what works for future runs).
Injection defects aren’t inevitable—with the right knowledge, you can cut scrap by 30% or more! Struggling with a tricky issue? Drop a comment, and I’ll help you troubleshoot!(Bonus: Reply “Defect Chart” for a free downloadable PDF of common defects + solutions!)