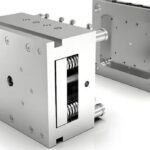
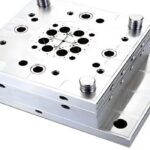
Cleaning injection molds properly is a critical part of maintaining mold performance and ensuring high-quality parts. Over time, molds can accumulate dirt, dust, residue, and contaminants that can affect part quality, lead to defects, and shorten the mold’s lifespan. Regular and thorough cleaning helps remove these unwanted materials, ensures smooth operation, and maintains precision in part manufacturing.
In this guide, we will walk through the best practices for cleaning injection molds, with a focus on safety, efficiency, and best practices for ensuring that your molds remain in optimal condition for longer production runs.
Why Is Cleaning Injection Molds Important?
Proper injection mold cleaning is essential for several reasons:
1. Prevents Defects
Over time, residues from the plastic material or contaminants can build up on the mold surfaces. These residues can cause issues like poor surface finish, incomplete molding, or part sticking. Regular cleaning helps avoid these defects, ensuring that parts come out with a clean surface and consistent quality.
2. Reduces Wear and Tear
Dirt, debris, and plastic residue can wear down mold surfaces, causing damage and reducing mold life. Cleaning the mold helps reduce the buildup of contaminants that can cause corrosion or excessive friction, which contributes to wear and tear.
3. Improves Efficiency
A clean mold operates more efficiently, providing smoother ejection, uniform material flow, and reduced cycle times. A mold that is regularly cleaned can maintain its precision and improve the overall production process.
4. Extends Mold Life
By keeping the mold surfaces free of debris and contaminants, regular cleaning can extend the mold’s lifespan, reducing the need for costly repairs and replacements.
Step-by-Step Guide to Cleaning Injection Molds
Now that we understand the importance of cleaning, let’s go through the step-by-step guide for cleaning injection molds the right way. It’s important to follow each step thoroughly to ensure that the mold is cleaned safely and effectively.
Step 1: Safety Precautions
Before beginning any mold cleaning process, always take the necessary safety precautions:
- Wear appropriate personal protective equipment (PPE): Gloves, goggles, and aprons are essential to protect yourself from cleaning chemicals and hot surfaces.
- Ensure proper ventilation: Use adequate ventilation in the cleaning area to avoid inhaling fumes from cleaning agents.
- Shut down and disconnect the machine: Make sure the injection molding machine is powered off and the mold is properly cooled before starting the cleaning process.
Step 2: Remove the Mold from the Injection Molding Machine
The first step in cleaning is to safely remove the mold from the injection molding machine. Follow these instructions:
- Turn off the power: Power down the injection molding machine and ensure that it’s completely off before removing the mold.
- Allow the mold to cool: If the mold was recently used, allow it to cool to a safe handling temperature before proceeding.
- Remove the mold: Using proper lifting equipment, carefully remove the mold from the machine.
Step 3: Disassemble the Mold (If Necessary)
In some cases, it may be necessary to disassemble parts of the mold to perform a thorough cleaning. This can help ensure that all areas are accessible for cleaning. Follow these steps:
- Identify removable components: Check for any components such as inserts, cores, or ejector pins that can be removed for cleaning.
- Use the right tools: Use non-abrasive tools like a torque wrench to disassemble parts of the mold to avoid damaging delicate areas.
Step 4: Initial Cleaning with Compressed Air
The next step is to remove any loose debris, dust, or plastic residues from the mold using compressed air.
- Use a clean, dry air source: Set the air compressor to a safe pressure (usually 30-40 psi) to avoid damaging the mold.
- Blow out debris: Direct the airflow into all cavities, undercuts, and intricate features of the mold to remove dirt, dust, and any loose plastic residue.
- Avoid spraying water: Compressed air should be used for this step, as using water too early may cause damage to the mold or cause rust to form on metal parts.
Step 5: Use a Soft Brush for Cleaning
After using compressed air, the next step is to remove any stubborn debris or plastic residue that remains on the surface of the mold. Use a soft brush to gently scrub the mold surfaces.
- Select the right brush: Choose a brush with soft bristles (such as a nylon brush) to avoid scratching or damaging the mold’s surface.
- Focus on hard-to-reach areas: Pay special attention to corners, edges, and other hard-to-reach areas where residue may have built up.
- Clean ejector pins and vents: These areas often accumulate debris and should be cleaned thoroughly.
Step 6: Apply a Mold Cleaner or Solvent
If debris and residue persist after brushing, apply a mold cleaner or solvent to dissolve hardened plastic or contaminants.
- Choose the right solvent: Use a cleaning agent that’s compatible with the mold material (usually a mild solvent, not too harsh to avoid corrosion).
- Apply sparingly: Spray or apply the cleaner to the mold surface, focusing on areas with built-up residue. Be sure to follow manufacturer instructions on how long to leave the cleaner in contact with the mold.
- Scrub gently: After applying the solvent, scrub the mold surface again with a soft brush or cloth to remove stubborn contaminants.
Step 7: Clean the Cooling Channels
The cooling channels play an essential role in the injection molding process, and they can become clogged with plastic residue. Cleaning the cooling channels is crucial to ensuring efficient mold performance.
- Flush the cooling channels: Use a gentle stream of warm water or a specially designed mold cleaner to flush out any contaminants from the cooling channels.
- Use cleaning rods or brushes: For narrow or complex cooling channels, use specialized cleaning rods or brushes designed for this purpose.
Step 8: Dry the Mold Thoroughly
After cleaning, it’s essential to dry the mold completely to prevent any rust or moisture-related issues.
- Use clean, dry cloths: Wipe the mold surfaces with a clean, dry cloth to remove any remaining moisture.
- Use compressed air again: Blow compressed air through the mold to dry out any remaining moisture, particularly from the cooling channels and hard-to-reach areas.
Step 9: Apply Mold Release or Lubricant
After the mold is completely dry, apply a mold release agent or lubricant to the mold surfaces to prevent material buildup during future production runs and to ensure easy part release.
- Spray lightly: Apply a thin, even layer of release agent to the mold, paying special attention to areas that come in direct contact with the molded part.
- Follow manufacturer recommendations: Always follow the manufacturer’s instructions for the proper use of lubricants and mold release agents.
Step 10: Reassemble and Inspect the Mold
Once cleaning is complete, reassemble any parts that were disassembled earlier and inspect the mold thoroughly to ensure that everything is in proper working condition.
- Check for any damage: Inspect the mold for any cracks, wear, or damage that may have occurred during the cleaning process.
- Reassemble carefully: Reinstall all inserts, cores, and ejector pins carefully to avoid misalignment or damage.
Cleaning injection molds properly is essential for maintaining mold performance, preventing defects, and extending the lifespan of your molds. Following a step-by-step cleaning process ensures that your molds remain in optimal condition, producing high-quality parts consistently. Regular cleaning, along with careful inspection and maintenance, will help maximize production efficiency and reduce downtime, ultimately improving the profitability of your injection molding operations.